DO IT YOURSELF GRANITE FAQ's
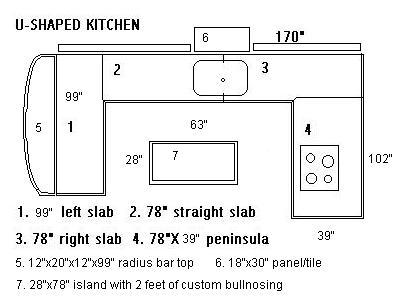
Example of how to place seams and slabs in your kitchen. Notice that a small seam is hidden in sink hole. Other seams occur near corners. Please email us for other sample plans like corner sinks, diagonal corners, large islands etc. You may fax us toll free at 800-891-4533 with your kitchen plans if you are unsure what to order (put a dotted line where you want bullnosing and a double-line where you want backsplash). Also include your windowsill size in case you want it bullnosed as well (sometimes there is some left over).
-
Are the following instructions all that is needed to install countertops?No. With your purchase we give you special instructions and templates for doing inside corners and surface mount holes that are not found here and make the job a lot simpler. You also receive as much advice as you need for your particular installation. Some of the following instructions may NOT be suitable for your application. Ask about our NEW CUT-TO-FIT(tm) SERVICE OF CUTTING INSIDE CORNERS PLUS MORE
-
How do I prepare my cabinets for Granite countertops? Although not
necessary, it is recommended that you apply ¾ inch plywood sub-counter
to the top of your cabinets to support the granite. This will add support
above appliances such as dishwashers and compactors, support holes for
sinks and cooktops and also help support small cantilevered ends and breakfast
bars. The slabs can be glued to this plywood surface. All the installation instructions are included with your order The other
advantage to plywood is that you can level the slabs much more easily without
moving them once they are in place (we tell you how). In any event, if
you are using frameless (european type ) cabinets or framed cabinets that
have upper retractable cutting boards, you will need to raise the granite
¾ inch to clear the double bull-nose which hangs down ¾ inch.
Plywood is a cheap and easy way to do that.
-
One side of my counter has to be made up of two sections of countertop.
How is this done? Almost all kitchens will have seams in the granite.
Usually they are difficult to see from a distance. If you look for them,
you will find them. Seaming is as easy as laying the granite slabs next to each other, and finishing with our exclusive Seamstone Kit (discounted to granite slab customers) It is important that the two slabs be at the same
level. We share the greatist trick for doing this. NOTE: We have a new procedure with our Seamstone(tm) Kit to make this MUCH easier (with large discounts to our granite slab customers).
-
How do I cut an inside corner? Typically a corner in granite is
done as a butt joint. Using our Kwik Korner Jig(tm) (discounted heavily to granite slab customers) this can be done accurately and easily. We also share the tricks of the trade for making the seam nice and tight (with your order) A 45 degree cut all the way through the granite
slab is usually only done for a heavily veined granite so that the veins
line up--a totally aesthetic decision that costs 4 sqft of granite. A butt
joint is also much easier to cut with a circular saw. We have a new tool, the Kwik-Korner(tm) jig to make the 45 degree cut easier and more accurately (with large discounts to our granite customers). ALSO NEW CUT-TO-FIT(tm) SERVICE OF CUTTING INSIDE CORNERS PLUS MORE
-
How do I cut out a hole for a self-rimming sink? Self rimming sinks
are sinks that lay on top of the granite and typically have a rim that
is one-half inch larger than the hole (cut-out) they fit into. Most newly
purchased sinks either come with a paper template or describe the cut-out
and give dimensions. In either case the template or dimensions must be
transferred to the granite where the sink is to be placed. It is very important to follow our procedure to do this as it is foolproof. There are tricks to reinforcing and even cutting this slab properly that no one will tell you. With 10 years experience with Do It Yourselfers, we have the correct instructions and hints for doing this right and SAFELY.With your order you will receive an instruction template that can drop out the center of the sinkhole with no dangerous knocking and only cutting from above. Also you will get instructions on simple but effective reinforcement. You will not have to carry a slab with a hole in it..
-
How do I cut out a hole for a cook-top? Follow the same instructions
as for a self rimming sink. You will normally find that the template for
a cook-top has 90 degree corners, making it easier. We do send you instructions and "tricks of the trade" with your order.
-
How do I cut out a hole for an under-mount sink?Most customers have us do their undermount sink holes since some of the tools you need end up costing about the same. You follow the
procedure for a self-rimming sink except that you will make the cut-out
one half inch smaller than what you want to end up with on the corners.
They will have to be straightened out and smoothed with our 2" Diamond Router Bit. The edges
can be polished by using our Rotary Polishing Kit made up of velcro-lined pads
of 8 different grades of special diamond embedded "sand paper". The sink
is mounted underneath after applying silicone to the mounting rim and is
held up with wood or metal supports screwed into the upper front and back
of the base cabinet. Faucet holes are drilled using our 1-3/8 Diamond Coring Bit. Better instructions for doing this are supplied with the Rotary Polishing Kit for granite.
-
How do I change the size of islands or bartops? We can do this for you by custom bullnosing these pieces to your specifications. This way no special tools are needed.
 © 2000-2008 Do It Yourself Granite, All Rights Reserved © 2000-2008 Do It Yourself Granite, All Rights Reserved
|